1. Densitometer and Density : A photo-electric device that measures the degree of darkness of the processed negative or degree of light transmitted or reflected back from the surface of an opaque object to calculate and set density values of the negatives and positives processed for printing.
The reading on the negative/ positive will indicate how dark is the processed areas (graduating tonal values) in the developed film. The films are basically coated with silver halide and when exposed the exposed areas will become black. The density reading consists of minimum 0.05 (D min) to maximum of 4.00 (D max) which help to adjust exposures for producing correct set of negatives/positives for further processing.
The density measurements between the two extremes which are dark to lightest area indicate whether correct exposure have been given, as well as processed with correct time factor in the developing solution. Usually a standard density wedge available with the photo material suppliers – band of paper or film showing graduated tones ranging from white to black- is used as the test image for these measurements.
The density reading also help in adjusting the ink levels i.e ink film thickness called solid ink density during the printing process. This values are compared with the standard color strip printed on the edge of the sheets or with the standard color strip kept offline. The color wedge is an image that is printed across the press sheet showing the solid ink densities, dot measurements etc. The colour strips are provided as standard film wedge and exposed onto the plates along with the image .
There used to be some confusion to the printers. Are the terms opacity and density the same? Yes technically both are same in respect of negatives and positives whose measurement is taken by transmission densitometer. The readings of Density and Opacity are measured and expressed in different values.
Densitometer is a useful tool if you want to maintain consistency and quality in the work. Universally two types of density meters are available :
- Transmission densitometers measures the amount of light transmitted through the transparent material such as negatives, positives and transparencies. It determines the opacity of different areas of transparency or of the processed film like negative or positive.
- Reflection densitometers measure the surface which is the print area or the image area of the original. The reflection readings are taken to calculate total dot gain, error in the colour shade, grayness of the area, and other characteristics in the printed work.
However some densitometers are also equipped to measure both the transmission as well as the reflective substances.
How does the densitometer help the printer? It is common knowledge that the appearance of the shade may be slightly different to every one who perceive the shade in their own manner and they cannot be standardized or calibrated like the densitometer because each ones eyes may have some defects or differences. Ones’ eye can not see the color of the object in the same hue as seen by others. For example a pure green printed patch may look dull green to some one, some other may see them as pure green, while others may say it as slightly bluish green and so on. This is because each one eyes are influenced by the light reflected from the object. The eyes can not therefore be a barometer to measure the the actual strength of the colour or shades of them uniformly and only a densitometer can give the correct ruling.
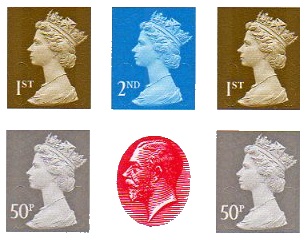
2. Die: A piece of metal plate made of steel or some hard metal containing engraved images (images in reverse and sunken) to give print impression with ink. There is also another set of male-female die which is meant to give only blank impression on the paper in the form of sunken print and they are also called a set of die. The third one refers to the cutting tool meant to cut or trim the sheets of paper or other substances to specific size or shapes.
The process of trimming or cutting the paper or the substances to specific size or shapes is called Die cutting process. The die making process is an special art carried out by engraving process and the artist engraves the images manually. Now the dies are also prepared on electronic machines. The paper or substance which require to have the embossing or debossing will be inserted between the male and female dies and then given a heavy pressure to create the image on the material.
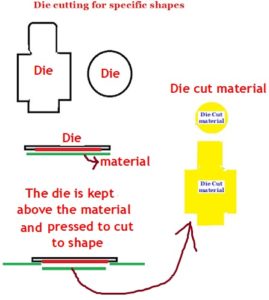
As far the special shaped dies are concerned they are carefully prepared to have sharp cutting edges to cut the material to a particular shape and therefore will not have a female die as its combination. The paper or substance to be cut to specific shapes are kept below the dies on a platen frame and the dies pressed against the substance to trim them to shape. Almost any shape can be created and applied to prepare Labels, envelopes, folders, cartons.
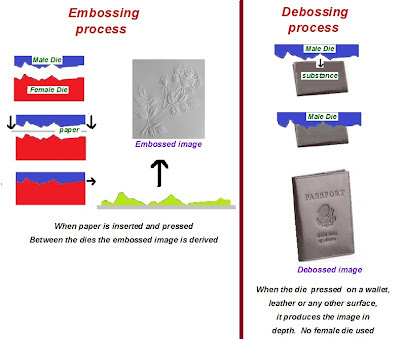
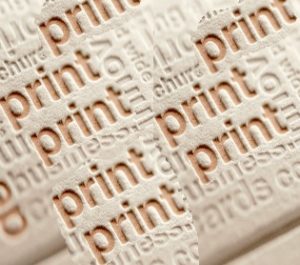
3. Debossing or Embossing : The opposite of blank embossing is called debossing. Instead of a raised image, letters or images are depressed into a sheet with a die in the debossing process. Embossing and debossing are two different processes of getting relief or depressed images on the paper or other substances using heat and force.
The procedure involves the use of two etched metal dies in both the cases . A raised male die and recessed female die, both fitting into each other is used to give the impression. A die maker engraves the desired design into the metal plates which is called the master die. The die with relief images will force the paper or the substance into the recessed die to create the debossed impression. Embossing creates a raised impression while debossing creates an indented (below surface) impression. The Passport cover is one such product that has the gold colored sunken impression.
A die maker engraves the desired design into the metal plates which is called the master die. Embossing is generally the process most often employed to attract attention or convey high quality textural contrast in relation to the surrounding area. Three dimensional effect can be produced by die printing process.
4. Direct Imaging: This process, also known as Copy to Plate is a new technology that directly transfers the digital image on to the plate surface using laser beams. The advantage is improved resolutions of the images and print quality as well. (For details read under CTP i.e Copy to Plate).
Since the laser records the images onto the plate exactly as per the digital files stored on a computer, the print quality will be excellent. Moreover the manual steps of conventional prepress work such as producing negatives and positives for plate making, then making plates out of those negatives or positives and mounting and registering the plates on the press etc are all eliminated. There are equipment available which can be attached with the offset presses to store the spool of special plates meant for direct imaging. As soon as the new plate is made ready by direct imaging process, such plates are automatically fed onto the plate cylinder from the spool. This reduces the make ready time drastically.
However such machinery and equipment have not totally replaced several of the existing printing processes but are slowly gaining entry in to the printing presses in Europe and American countries.
5. Dot: Also known as a pixel, the smallest element or a partial image of a halftone.
6. Deckle Edge : Term used in paper manufacturing technology is meant to to indicate the uncut, uneven paper edge that comes out of the paper making machine which is finally trimmed to make them have perfect cut edge while slitting.
7. Doubling: This is a Printing defect that occurs due to loose blanket or paper slipping during impression process on the printing machine. Some of the reasons attributed to this defect is uneven cylinder packing,loosening of blanket during printing, grippers not holding the sheets firmly, worn out plate or blanket cylinder gears, static charge (Static electricity) on paper, use of different blankets on the same machine etc. The image will appear blurred or shadowed.
8. Duo tone : The process of printing with two halftones plates. Both the plates have the same halftone images but each of them prepared in different screen angles and printed in two different colors one above the other. Out of the two plates with same image, one will have prominent highlights and the other contain middle tones and shadows. Both the halftone images on the plates will have 30° angle difference between them and printed- one with lighter colour and the second with darker colour- to get the Duo tone effect i.e effect of two colours with one image.
For example if one negative is prepared with 15 degree angle screen, the same image will b prepared with 45 degree angle screen to make two sets of plates. Thus printing an halftone image superimposing dark colour over light color will produce the effect of Duo tone. This process is not to be confused with colour separation. The expert printing presses exclusively printing duo tone keeps separate set of inks to give depth to the print quality. The duo tone concept has enlarged to tri tone printing, meaning printing the same image in three colors with three different screen angles, all one above the other and then quad tone meaning printing the same image in four colors with four different screen angles, all one above the other.

…………Additions to alphabet D to be continued under D/2







Recent Comments