

Alphabet- M
1. Make ready: All the activities like setting the machine feeder, positioning the plates/ blocks with text matter, readying blankets (in offset and Intaglio), inking, loading the paper, registering the images on paper, setting appropriate colours etc which are required to be carried out before commencing the actual run on the machine or any such productive machinery activity that stretches to Numbering, mass stock trimming etc are called make ready.
Once the make ready is over the machine gets ready for final run. This also applies to the respective activities in bindery dept where all the material required are pooled and kept ready for final operation. The paper used for make ready is treated as waste paper, but used for trial sheets till they become non usable. Keeping everything ready by the process of make-ready helps to reduce productive run and most of the press troubles thus ensuring a quality print run.
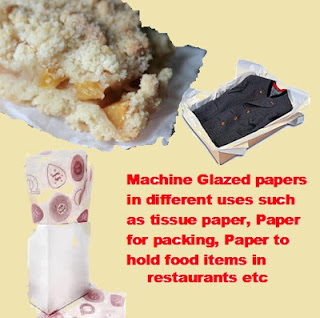
2. Machine Glazed (MG) Paper: Paper having high-gloss finish on one side is called Machine glazed. This is done in the paper mill by passing the finished paper in a Yankee machine which has a single highly-polished steam-heated drying cylinder. The classic example of machine glazed paper is the tissue papers used in the parties, functions and restaurants to wipe hands,. They are also used for printing posters, general wrapping, scrunching, void-filling and for interleaving etc.
It is also extensively used by the garment factories, in bakery and retail trades. Two varieties of tissue papers are available. One is white in colour and the other is machine glazed Kraft paper. In the issue of tissue paper should not be confused with standard MG (Machine Glazed) acid free tissue or the more luxurious, premium MF (Machine Finished) acid free tissue used for face cleaning.
3. Male Die: Pl read details under Die and Debossing.
4. Manuscript : Any original material – either hand written, typed or submitted as soft copies for printing is called the manuscript. The manuscript is supplied by the author who penned the theme or submitted by the publisher to the printer.
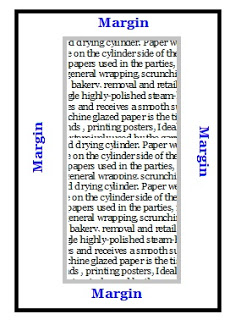
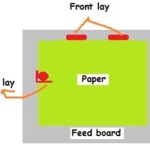
5. Margin : The un printed areas or white space given around four sides of the printed material is called margin. The margins depend upon the lay out prepared.
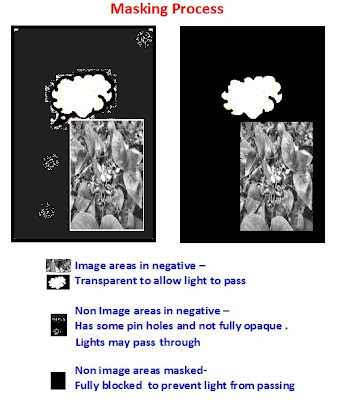
6. Mask or masking : The process of blocking out the unwanted, not to be printed portions in the negatives or positives from getting exposed on to the plates during plate-making is called masking. It is done by blocking such areas using black paper, or painting with special opaque colour (reddish in colour). This is also called retouching work in the process department.
The following illustration will explain this type of masking.
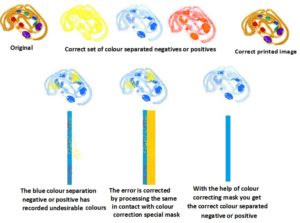
Similarly there exist another process called Photographic masking in which the colour separated negatives or positives are color corrected to bring the negative or positives close to produce images matching the original colors. During color separation if some color separated negatives or positives registered undesirable colour in one particular film , they have to be removed failing which the reproduced print will not match the original colours as seen in the image.
In such cases first the artists used to retouch the negatives or positives using certain chemicals to either add or remove those un desirable colours or strengthen deficient portions of shades before processing the plates for printing. This is called dot etching.
For example in the color separated negative/positive meant for printing yellow color, due to process deficiency or technical fault some of the cyan portions of the images in some areas have also been recorded, though as weak image. If the uncorrected yellow negative or positive with the said defect is printed, the yellow areas will appear bluish yellow when the Cyan is over printed . The yellow which should stand out in true colour will appear slightly bluish yellow due to the presence of too much Cyan in those areas . This defect therefore need to be corrected by either dot etching or when can not be corrected manually by the artist especially in high quality close works, the undesirable portions need to be corrected by photographic masking technique.
In order to make the correction by photographic masking masks called Multi mask,Veri mask ans several other special masking films supplied by the photographic film manufacturers is used to alter the areas of tone or color on litho film. Now the photographic technique of masking has slowly vanished due to the emergence of auto correcting scanners and auto colour correction equipment .
The following illustration will explain photographic masking.
7. Mid tones : In any photographs or illustration, the tones (shades) represented by dots ranging from 30 to 70 percent of coverage are called middle tones (mid tones).
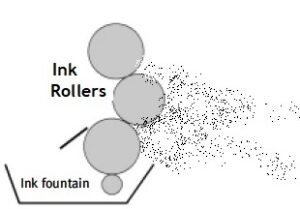
8. Misting : Ink Misting also called flying of ink is a printing ink defect in which ink flies like mist and fall on the substance printed and other machine parts. This is common defect that occurs particularly in Offset printing presses that run at high speeds. This phenomenon of droplets of ink being thrown off or getting sprayed from the roller chain during machine run occurs sometimes in long run. The possible causes for this defect is too heavy an ink film being run on the rollers, press speed is excessive for the type of work being printed, improper ink- water balance in Offset printing machine, worn out rollers, incorrectly set rollers, the ink emulsification, too low tack of the ink etc.
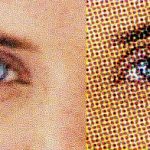
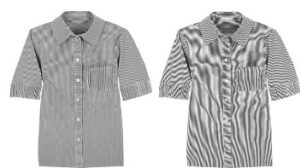
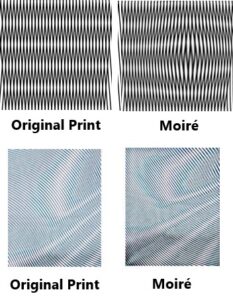
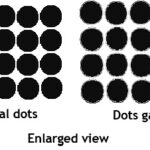
9. Moire effect : An interference pattern, or moiré is undesirable appearance of the printed halftone image instead of appearance as clean sharp printed image. Moiré, an abnormal printing pattern formed by irregular screen tone, may adversely affect the print quality. A moiré pattern is caused when the screen angles of an image are not set to the required angles. This happens in both Offset and Letterpress printing processes due to poor quality of reproduction technique deployed while making negatives or positives to prepare plates for printing. In order to understand how the undesirable pattern or Moiré, is created, we need to know the basic reproduction process.Every photograph whether black and white or colored images will virtually have unlimited range of shades from greys to black, or different other colour hues. If they are to be reproduced by the printing process, the shades and hues in the images will have to be broken into tiny dots or pixels of varying sizes in order to get printable form of images. This is achieved with a medium called Halftone Screen. Conversion of continuous tone images into printable halftone images is done by graphic arts reproduction process called halftone imaging process.
For reproducing single colour or black and white picture, a halftone screen is used for making negatives or positives to prepare plates for printing. If it is already a printed image, such as is found in a newspaper or magazines showing the halftone dots clearly, then the negative could be prepared like line work without using a screen or slightly de focus the image to the extent of 5% max and then use halftone screen to make negatives. It will then not result in printing with moiré pattern. The most common cause of a moiré pattern in an image is re-screening of an already printed image without first de focusing the image. This depends on the competence of the operator.
The moiré can also occur when the image from a computer display or TV screen is reproduced by photographic means by clicking photos from the computer and then rendered in a screened or dot-matrix format.
While reproducing multi colored pictures, different angled screen dotted negative or positives are produced, each colour is screened into a pattern of dots, angled differently to form a full colour image. If different angled screens are not used, then all the dots will fall one on top of the other resulting into one colour image. One basic way of attacking moiré is through the use of universally accepted halftone angle sets preferably with 30° difference which places the dots in juxtaposition.
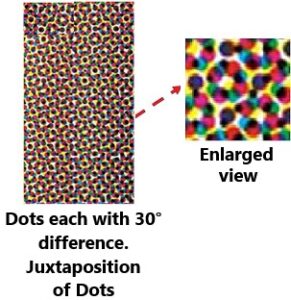
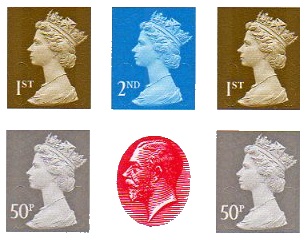
The common screen angles used in the colour separation work is Magenta 75°, Yellow 90°, Black 45° and for Cyan 105° or 15°. A moiré will definitely be visible if the 90 degree angle is utilized for any other colour plate than Yellow.
The other most common cause of a moiré is also noticed in the misaligned screens during the scanning process which however has now been reduced by the use of Raster Image Processors (RIP).
Sometimes the moiré patterns are also deliberately created by Graphic arts artists or visualizers for reproducing eye-catching designs and visual impact.
…………Additions to alphabet M to be continued under M/2


Recent Comments